
1. Introduction
This is the zeroth lesson in the python for chemists crash course. In this lesson, we will set up the python environment and run a line of code or two . You can watch this lesson as a video or read through the transcript here.
1.1. What is python?
![]()
Python is an interpreted, general purpose programming language that is currently among the most popular and most used languages (number 1 in the PYPL index, for example).
interpreted means, that the Python code is not translated into machine code before execution. Instead, python programs are shared as human readable text files
general purpose means Python is not written with a specific application in mind. You can use Python to write a web server, control your lab equipment or evaluate your data.
The reference implementation of Python, CPython, is free and open source (FOSS) and is available for Windows, MacOS and Linux (and other platforms). It comes with a large range of standard libraries that cover everything from downloading files from the internet or sending emails, zipping and compressing files to math functions.
1.2. What will this course cover?
Given Python’s popularity and its FOSS nature, the Python ecosystem has become very large and it would be hard to cover every package and add-on written. We will focus on understanding the basic structure of Python programs and getting to know a few packages that are useful for chemists:
plotting,
data processing
statistics
machine learning using supervised and unsupervised methods
We will mainly work in a programming environment called “Jupyter Notebooks”. These are an environment that allow us two write small snippets of code and directly look at their output.
1.3. Why should you take this course?
In this course you will learn…
how to save time on tedious, boring tasks
how to perform data processing in a reproducible, self documenting way
how to use and combine Python packages to perform complex data evaluation
how to create great looking visualisations with a few lines of code
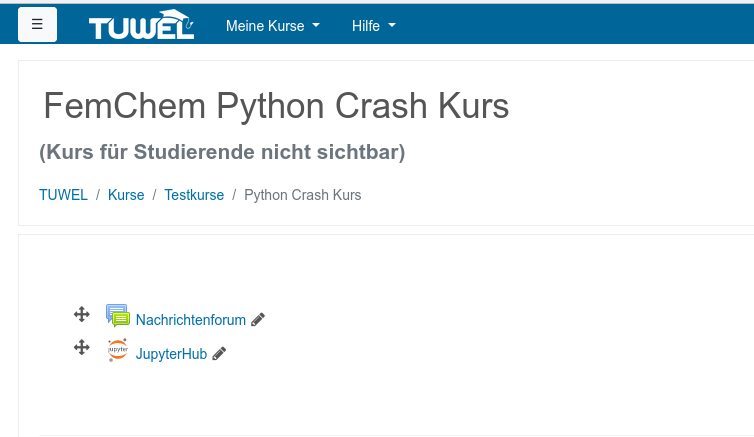
1.4. Getting started with python on TU jupyterhub
When you have subscribed to the TUWEL course for this crash course, an online python interpreter is provided for you for the duration of this course. This is also where you will receive your exercises. To access this python interpreter, click on the JupyterHub link in the TUWEL course. How Jupyter works will be explained below:
1.5. Setting up python on your own computer
If you want to keep using python past the crash course, is probably a good idea to download and install Anaconda. Anaconda is a free python distribution, that includes pre-compiled packages.
Install Anaconda for Python 3.x 64bit
Go into anaconda navigator and install the additional packages required for the exercises (see test page for exercises)
Test that Jupyter notebook is working
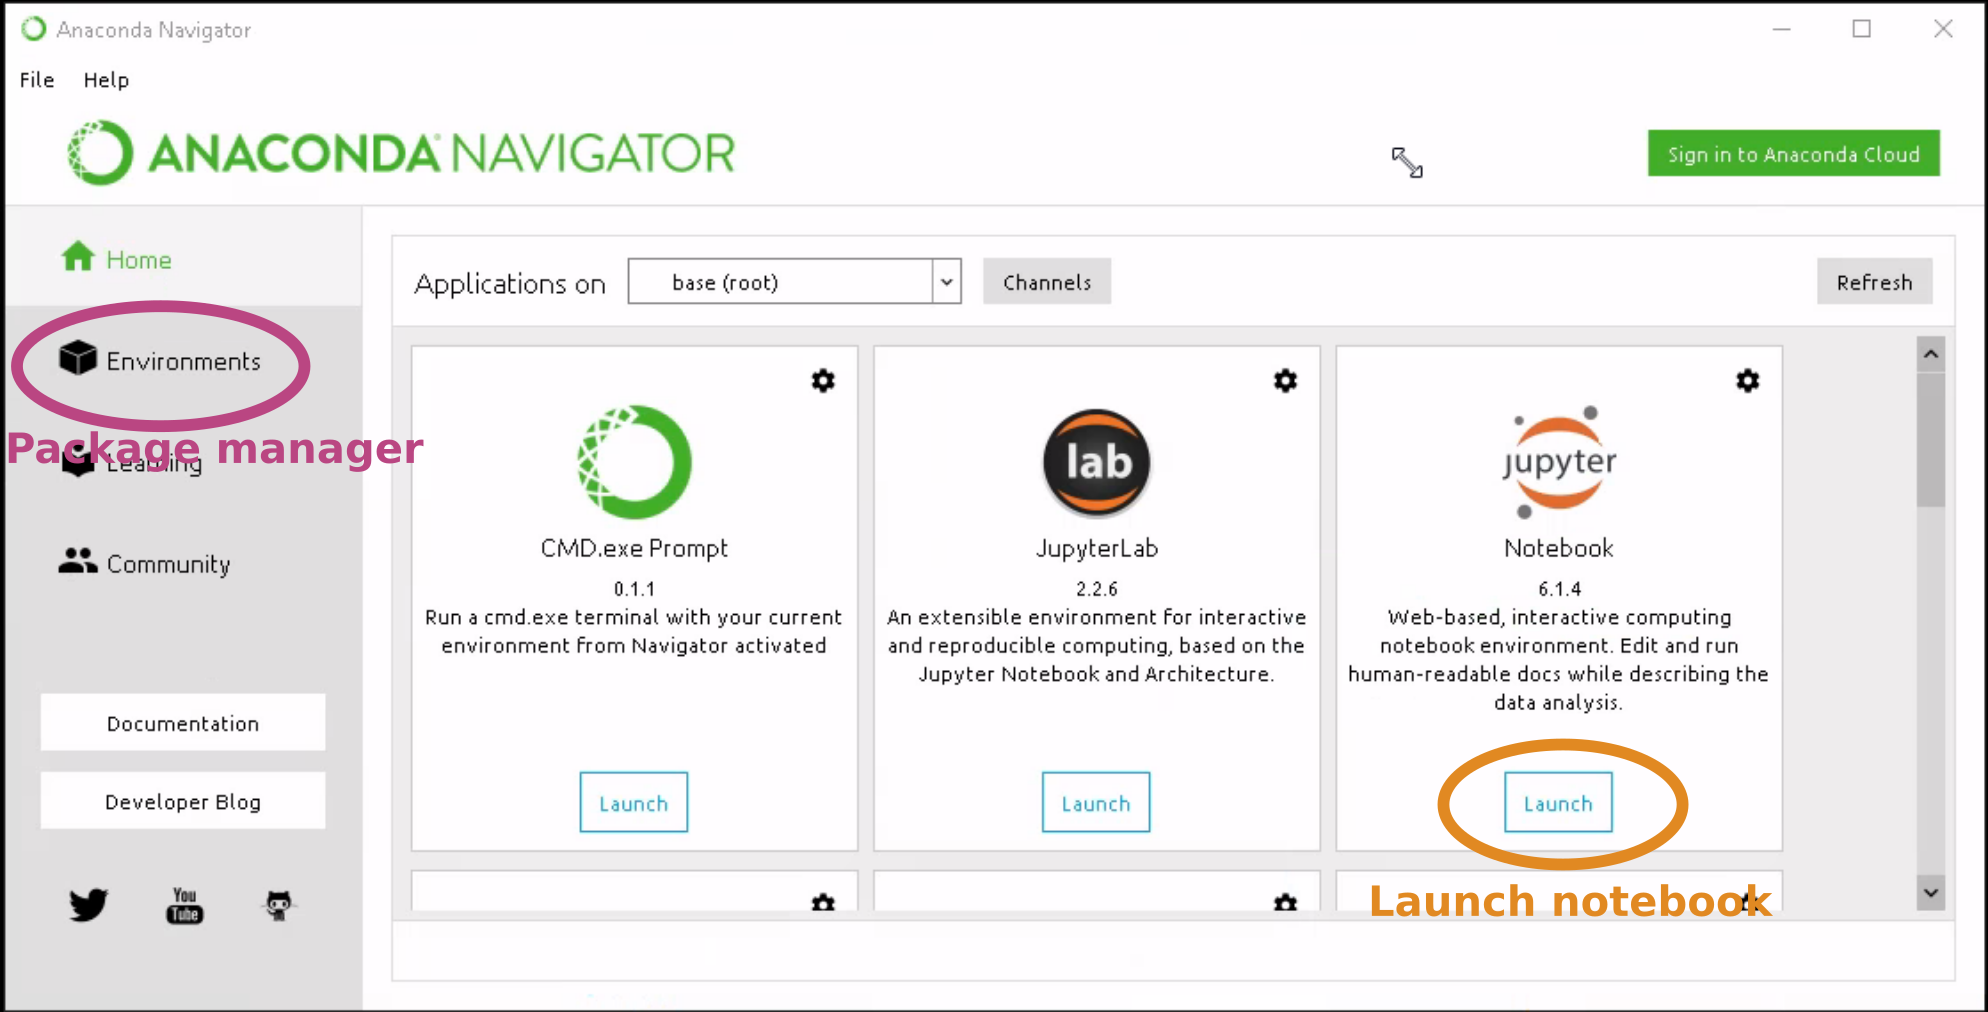
Once you have opened the Anconda Navigator, you can click the launch button in the juypter notebook tile to start jupyter. The environments tab contains the anaconda package manager that we will need to use to add additional packages as listed on the test page.
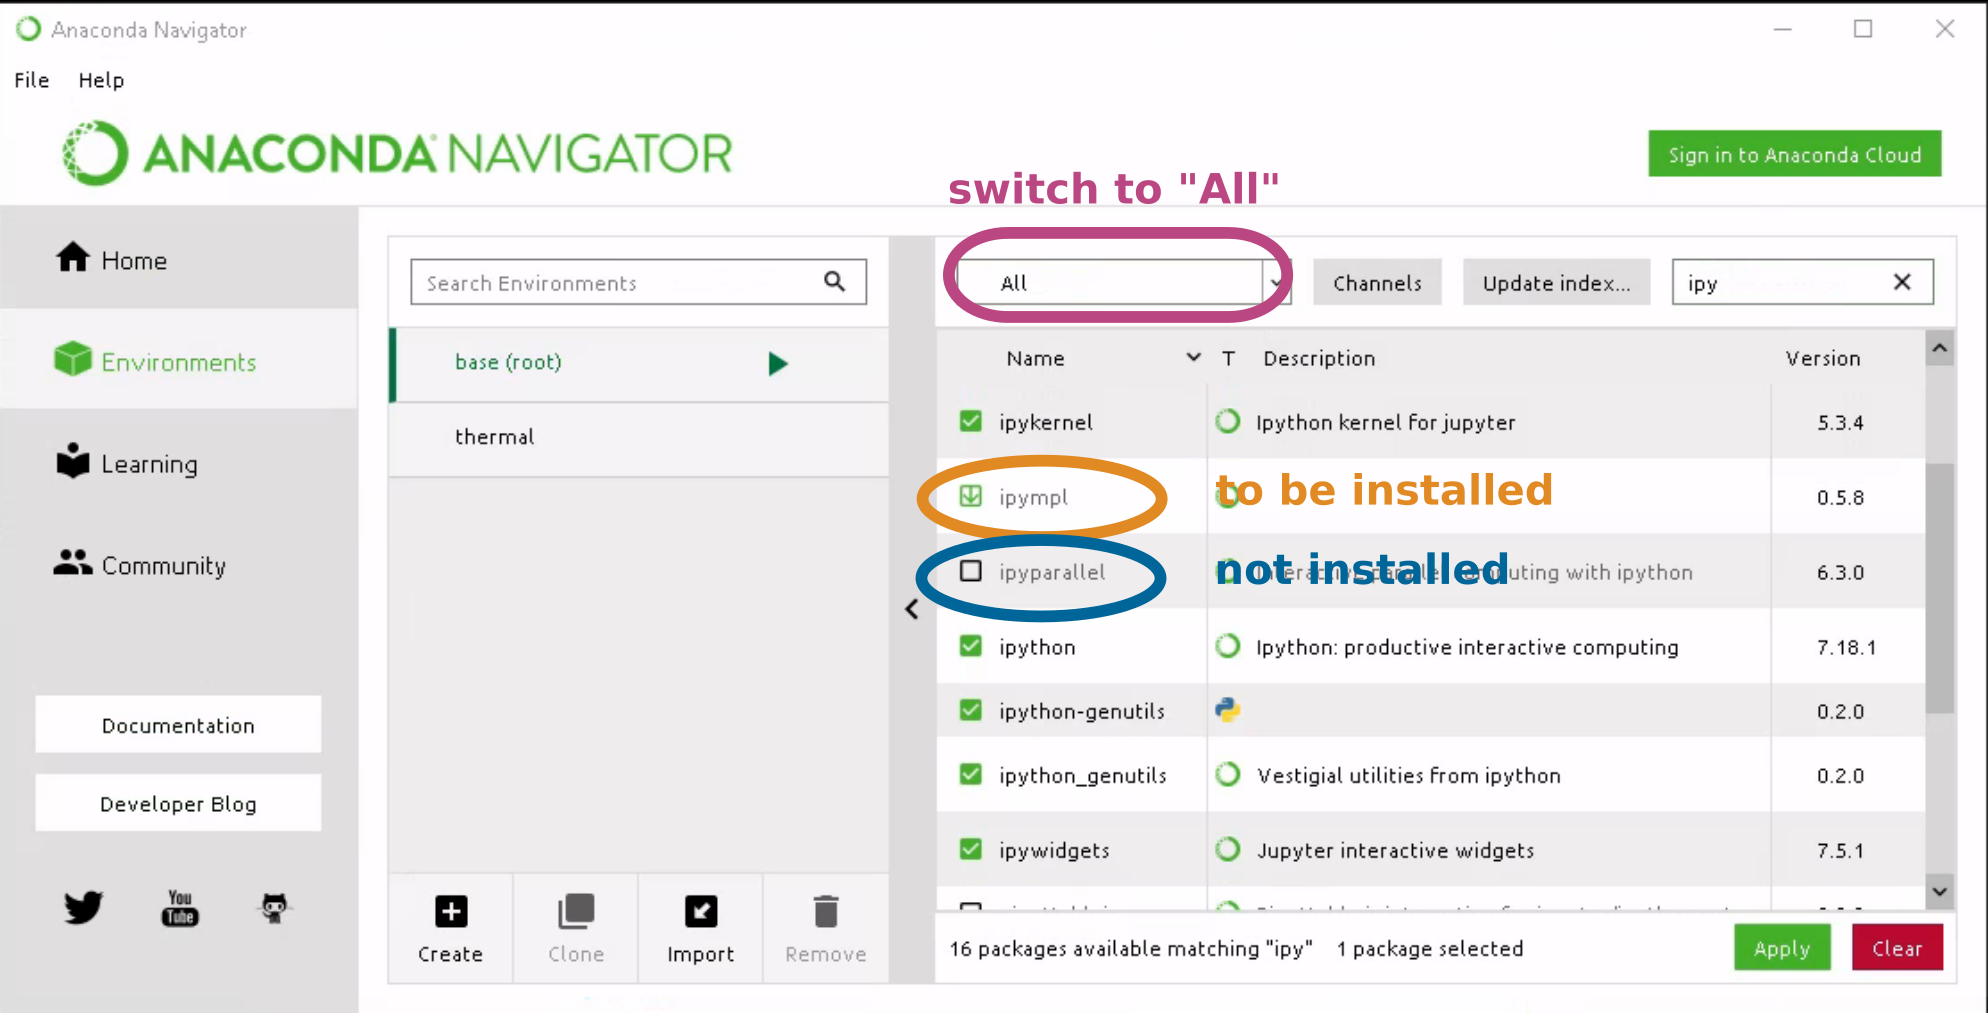
In the environments tab, first change the package filter to “all” to see installed and not installed packages. In the search bar in the top right corner you can type in the package name. A green check mark next to the package means that the package is already installed. An empty box means that the package has not yet been installed. Click to mark for installed (i.e. the green download arrow). When you click apply, all packages marked for installation will be installed.
1.6. Using Jupyter Notebook
Jupyter notebook is an interactive programming environment for python (and other languages). It is especially useful for performing complex data evaluation, as you can keep the text describing what you are doing together with your code and its outputs.
To launch jupyter notebook, open Anaconda navigator and click the launch button for juypter notebook.
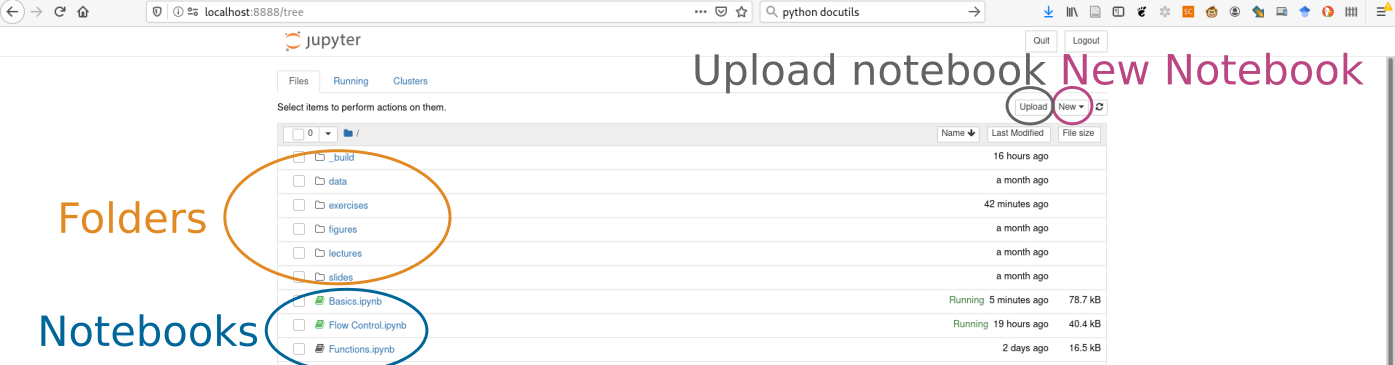
The notebook tree view will open in your web browser. Use to file/folder list to navigate to a folder that contains your notebook. You can move upwards by using history back in your browser or by clicking on the two dots at the top of the folder list. When you click on a notebook (.ipynb filetype) in the jupyter tree view, that notebook is opened in a new browser tab. The green color in the tree view denotes currently open/running notebooks.

All of the slides and the website for this course are actually jupyter notebooks. You can download them using the download button in the top right corner of each website. This way you can play around with the code examples yourself. The notebooks are also available on the shared drive on jupyterhub.

A Jupyter Notebook consists of multiple cells. Each cell can contain either code or text. You can switch the type of content by clicking the cell and then selecting either “Markdown” (for text) or “Code” for Python code:
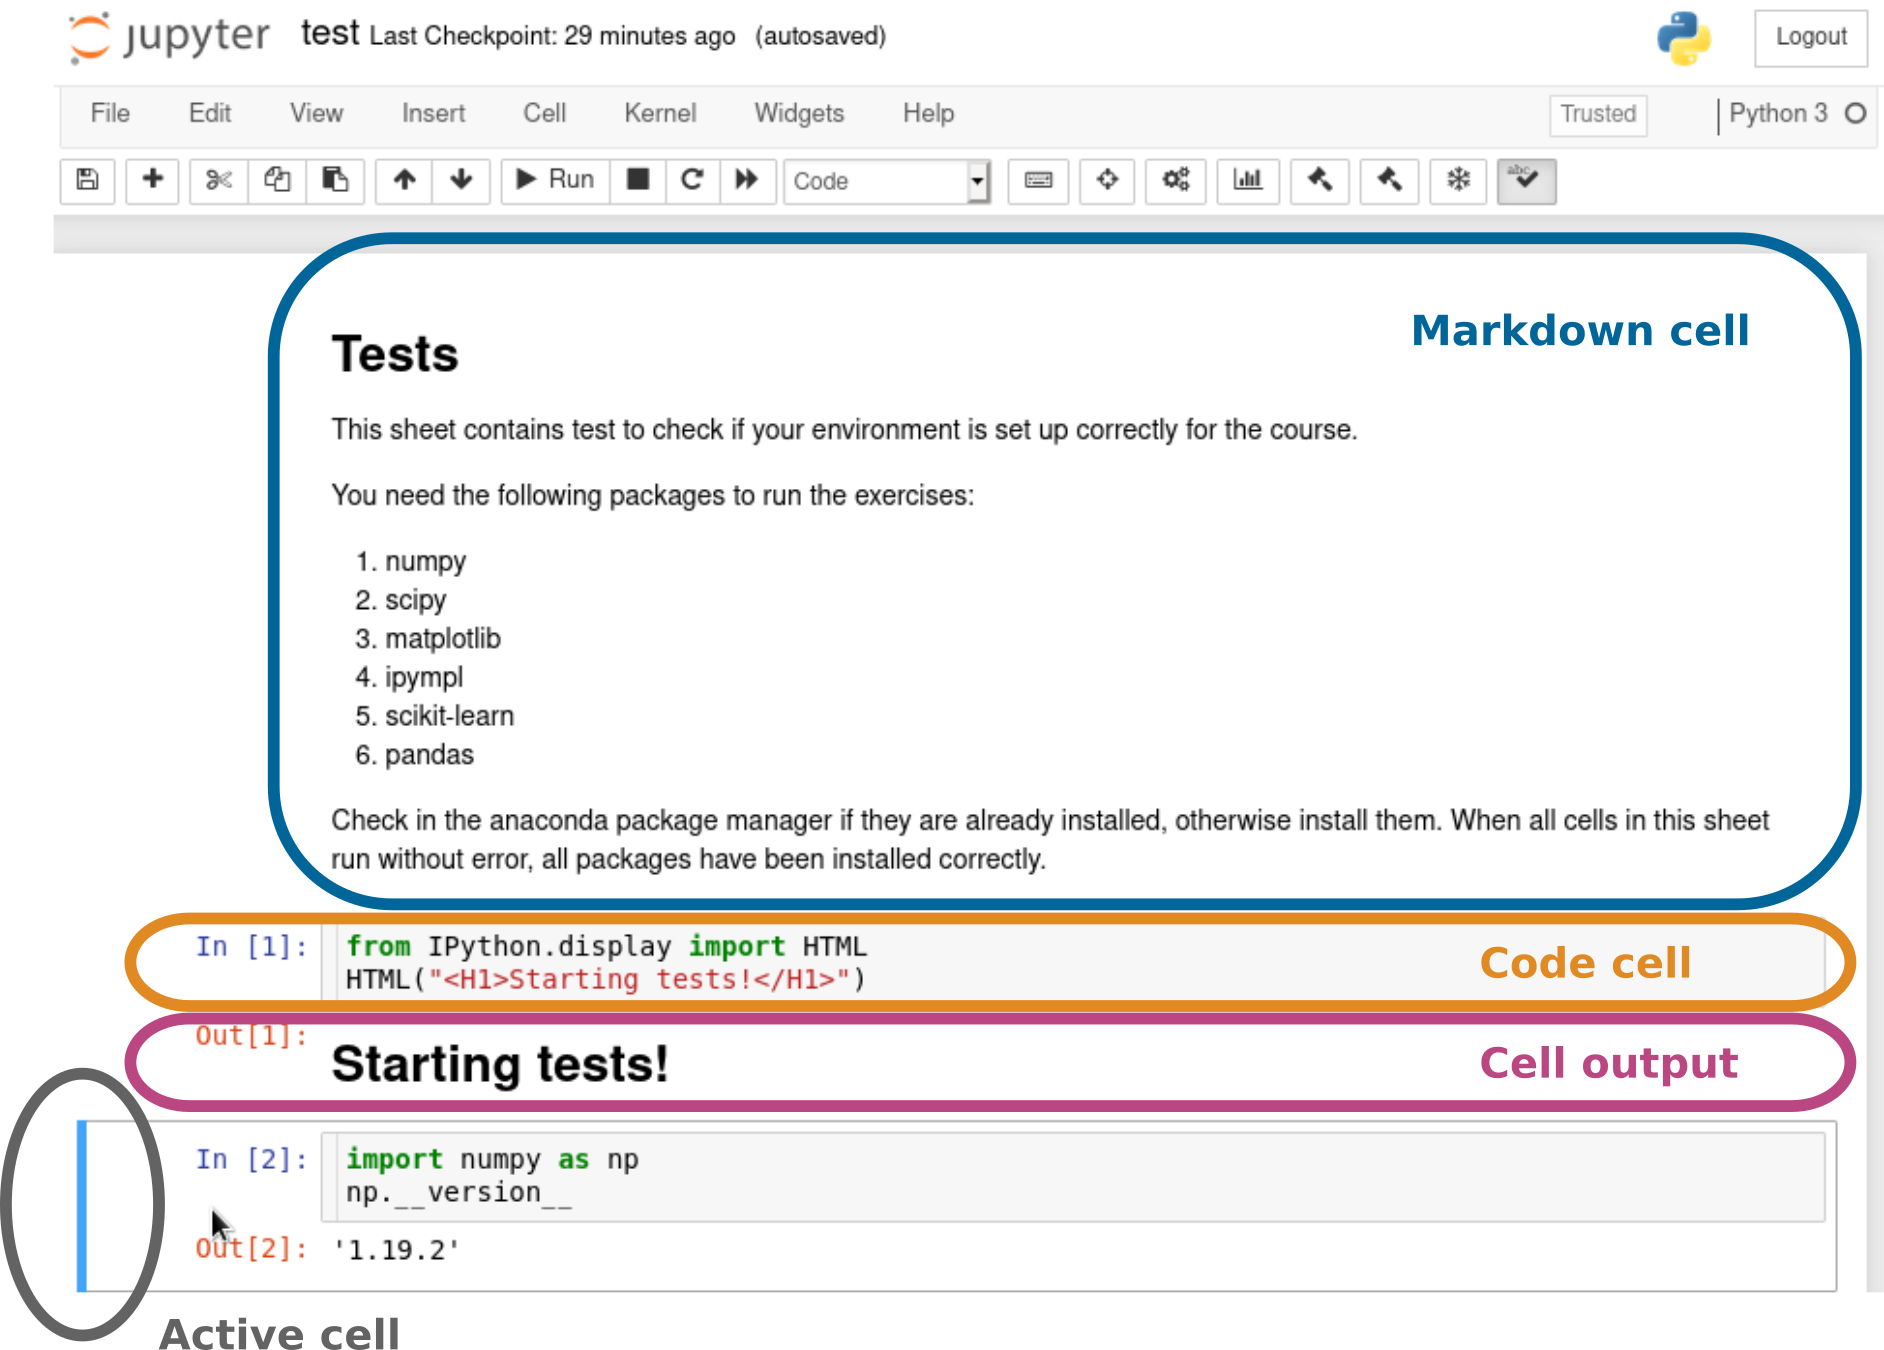
To execute a code cell, push ⇧ + ⏎ on your keyboard. For Markdown cells, this will convert the text to a rendered version and display it. For Code cells, the code will be executed. The cell output, usually the value of the last statement in a code cell, anything that has been displayed using the print function, as well as any figure created in the cell will be displayed below the cell once it has finished executing.
By left clicking on a cell in the notebook, you can make it active, meaning that ⇧ + ⏎ will run that cell next
Not all code inside a code cell leads to an output. By default, only the value of the last line in the code cell leads to an output. An exception are anything that is printed using the print or display function and figures generated by matplotlib.
"This will not be displayed"

print("This is printed")

"This will not be displayed"

"This is what the last cell returns. It will also be displayed."
This is printed
'This is what the last cell returns. It will also be displayed.'
The numbers to the left of the code cells and output cells show in which order the code cells were executed. You can execute a single cell multiple times or even execute them out of order. However, ideally, your sheet should work when executed in one go, from the first to the last cell, using “Kernel > Restart&Run All”
When an error occurs within a cell, execution is stopped. Statements happening after the error are not executed.
print("This is still executed")


assert 1 == 2

print("This won't be executed")
This is still executed
---------------------------------------------------------------------------
AssertionError                            Traceback (most recent call last)
<ipython-input-2-108db26d91f1> in <module>
      2
      3
----> 4 assert 1 == 2
      5
      6 print("This won't be executed")

AssertionError:
Ideally, your sheet should be self explanatory. The Markdown explain the big idea of what you are trying to achieve, while inline comments can explain finer details (e.g. why you chose a specific, counter intuitive command).
You can add new code cells by clicking the plus sign in the tool bar.
That’s it. Now you’ve gotten Python to run and executed your first python code. These are your first steps to becoming - as the kids are saying these days - a pythonista.